
Table of Contents
Introduction to FabFilter Pro-L 2
FabFilter Pro-L 2 is a professional-grade brickwall limiter plugin widely used in mixing and mastering. Renowned for its sonic transparency and intelligent metering features, it’s one of the most trusted tools in both studio and broadcast environments. Whether you’re working on a subtle jazz master or a loud and punchy EDM track, Pro-L 2 offers surgical control over the dynamics and final loudness of your audio.
With streaming platforms and broadcast standards becoming increasingly stringent about loudness normalization, the need for a precise, true peak-compliant limiter is greater than ever. FabFilter Pro-L 2 delivers exactly that, along with comprehensive visual feedback and multiple limiting algorithms to suit every production style.
Key Features Overview
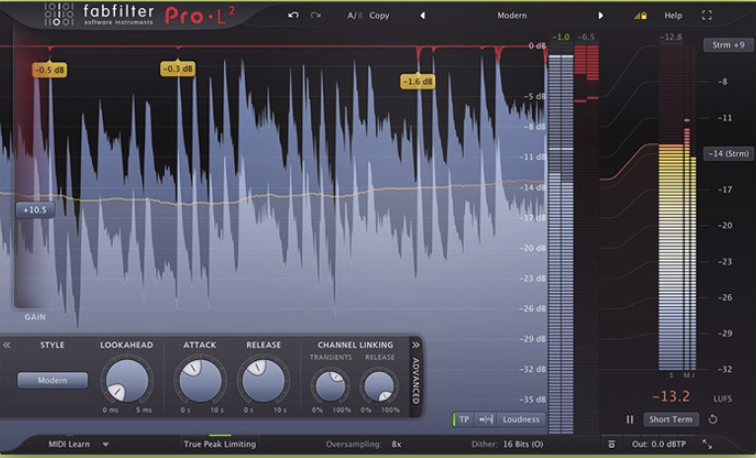
- Eight Limiting Algorithms: From Transparent to Aggressive, each style is optimized for a specific use case.
- True Peak Limiting: Ensures no inter-sample peaks go beyond digital 0 dBFS.
- Extensive Metering: Includes LUFS, True Peak, Peak, RMS, and momentary loudness monitoring.
- Oversampling: Up to 32x to reduce aliasing and enhance clarity.
- Lookahead, Attack, and Release Controls: Provides precise control over how the limiter reacts.
- Advanced Dithering and Noise Shaping: Perfect for preparing audio for CD or other bit-depth-limited formats.
- Stereo Linking Options: Control transient and release linking separately.
- Advanced Gain Staging Capabilities: Critical for modern mixing and mastering workflows.
Understanding the Limiter Styles
Pro-L 2 features eight different limiting algorithms. Understanding their tonal characteristics is key to choosing the right one for your track:
- Transparent: Provides clean, invisible limiting with minimal coloration. Ideal for acoustic and pop music.
- Punchy: Adds perceived impact to transients. Works well on drums and modern hip-hop or EDM.
- Dynamic: Maintains a more open dynamic feel while still limiting peaks.
- Aggressive: Introduces intentional saturation and clipping artifacts, often used for loudness-driven genres.
- Modern, Bus, Safe, Unity Gain: Each optimized for specific scenarios such as group bus processing or mastering for conservative levels.
Each algorithm reacts differently to transients and RMS energy, making it important to audition each one during critical listening.
Detailed Parameter Breakdown
1. Gain
Controls the amount of input gain before limiting occurs. This is the primary control for pushing the signal into the limiter. It should be used in conjunction with the metering tools to find a good balance between perceived loudness and dynamic integrity.
2. Output Level
Sets the final output ceiling. It’s generally recommended to set this to -1 dBTP when mastering for digital streaming services, in order to avoid inter-sample peaks during conversion.
3. Lookahead
Defines how far in advance the limiter “sees” the incoming signal. A longer lookahead allows more transparent limiting at the cost of added latency. Values between 5ms to 10ms are typical for mastering.
4. Attack and Release
Although Pro-L 2 is not a compressor, it provides these controls to fine-tune how aggressively or subtly the limiter engages.
- Attack: A faster attack clamps down on transients more quickly, while a slower attack allows some transients to pass, adding punch.
- Release: Controls how fast the limiter returns to zero gain reduction after the peak has passed. A well-tuned release time ensures smoother dynamics.
5. Channel Linking
You can control how the limiter handles stereo signals.
- Transient Linking: Links peak detection across left and right channels to preserve stereo image.
- Release Linking: Affects how the release behavior is synchronized between channels.
These options are important for complex stereo content like full mixes or stems.
True Peak Limiting and Metering Tools
Pro-L 2’s true peak limiting ensures that inter-sample peaks — which can occur during DA conversion — are caught and controlled. This is especially important in mastering for platforms like Spotify, Apple Music, and YouTube, all of which use LUFS-based normalization and penalize distorted content.
The metering section in Pro-L 2 is comprehensive:
- Integrated LUFS
- Short-Term and Momentary LUFS
- Peak and RMS Meters
- True Peak Metering
- Histogram View
- Loudness Target Modes (EBU R128, ATSC A/85, etc.)
These metering tools not only help with loudness conformity but also provide real-time insight into dynamics and transient behavior.
Oversampling and Dithering
Oversampling improves the internal processing quality by reducing aliasing. While 2x or 4x oversampling is often enough, up to 32x is available for the most critical audio applications. Note that higher oversampling increases CPU usage.
Dithering is crucial when reducing bit depth (e.g., 24-bit to 16-bit). Pro-L 2 provides three dithering modes (None, Triangular, and Noise Shaped), along with three noise shaping curves (None, Mild, Moderate, and Strong). For best results, only apply dithering once, during final bounce to CD-quality audio.
Get FabFilter Pro-L 2 today from Plugin Boutique — the industry-standard limiter trusted by top engineers for transparent, true peak limiting and professional loudness control.
Buy FabFilter Pro-L 2 on Plugin Boutique
Includes free rewards, instant download, and license registration.
Advanced Section: Gain Staging with FabFilter Pro-L 2
Proper gain staging is critical to achieving both clean processing and maximum loudness potential. Pro-L 2 plays a central role in final-stage gain staging, but it must be integrated thoughtfully into the full mix or mastering chain.
What Is Gain Staging?
Gain staging is the process of managing levels throughout the signal path to maintain optimal headroom and signal integrity. Poor gain staging can lead to unwanted distortion, limiter pumping, or even unintentional clipping.
>> READ OUR FULL GUIDE TO GAIN STAGING
How Pro-L 2 Helps with Gain Staging
- Input Gain Monitoring
- Use the Gain knob to push the signal into the limiting stage.
- Combine this with LUFS meters to ensure loudness targets are met (typically -14 LUFS for streaming).
- Peak Control via Output Ceiling
- Set the Output Level to -1 dBTP or lower to avoid clipping during D/A conversion.
- Meter-Based Feedback Loop
- Use the True Peak Meter and Histogram to see how your signal behaves in real time.
- Adjust gain until you’re maximizing loudness without excessive gain reduction (>5–6 dB typically starts to sound compressed).
- Chain Integration
- In a mastering chain, place Pro-L 2 after any saturation, EQ, and multiband compression.
- Use Unity Gain mode to A/B processed vs. unprocessed signal at matched volume.
- LUFS Normalization for Distribution
- Use Integrated LUFS and set target loudness according to the platform:
- Spotify: -14 LUFS
- YouTube: -13 LUFS
- CD Mastering: -9 to -11 LUFS
- Use Integrated LUFS and set target loudness according to the platform:
Gain Staging Tip
Enable Unity Gain Monitoring during mixing and mastering. This allows you to bypass the gain boost added by Pro-L 2 for a more accurate A/B comparison, helping prevent over-limiting and loss of dynamic range.
Best Practices for Mastering with Pro-L 2
- Always analyze the loudness and peaks of your track before applying limiting.
- Choose the limiting algorithm based on genre and content — Transparent for orchestral, Aggressive for EDM.
- Aim for moderate gain reduction to retain dynamics.
- Use True Peak Limiting and Dithering when exporting final masters.
- Calibrate your mix environment and use reference tracks to guide decisions.
- Don’t rely solely on visual meters — always trust your ears.
Conclusion
FabFilter Pro-L 2 is not just a limiter — it is a mastering powerhouse. With its robust algorithm selection, deep customization options, and comprehensive metering, it is indispensable for modern mixing and mastering. When combined with proper gain staging, Pro-L 2 helps ensure your tracks are clean, loud, and ready for any digital platform.
Mastering audio is both a science and an art. With tools like FabFilter Pro-L 2, you can deliver professional results with confidence, clarity, and control.
Bonus: Download Your Free Saturation Guide
Want to learn more about how to use saturation creatively and technically?
Download “Saturation in Mixing: A Brief Guide” here →